Higher safety for automotive and aerospace
Very high cycle fatigue (VHCF) assessment of laser additive manufactured (LAM) parts
Selective laser melting (SLM) is a laser additive manufacturing process where parts are additively manufactured using powder material with the aid of laser energy. A three-dimensional CAD model is provided as an input to the SLM machine which scans the geometry after slicing it into 2D layers. The laser energy selectively melts the powder particles at the desired location of the component to be manufactured.
The unique manufacturing capability of SLM process makes it suitable for aerospace, automotive and biomedical applications. Several alloys like aluminum, titanium, steel and nickel-based alloys have been processed by SLM technique [1, 2]. Although the fatigue strength diminishes for SLM processed materials in the “as-built” condition due to the process-inherent surface roughness, fatigue performance after post-processing is suitable for many applications in the aviation and medical industry [1].
Contrary to the previous assumption that the materials do not fail under fatigue if the applied stress is below the so-called fatigue limit; with the availability of the novel very high cycle fatigue (VHCF) testing techniques, it has been found that materials do fail under fatigue loading even when the stresses are below the conventional fatigue limit, suggesting the non-existence of such a limit [3,4]. Some alloys of both lattice types, bcc (body-centered cubic) and fcc (face-centered cubic), show a change in crack initiation site from surface to subsurface in a region from HCF (high cycle fatigue) to VHCF [5].
Experimental methodology
The test samples of AlSi12 alloy were manufactured using a commercially available SLM system in an inert environment using argon gas. Details of the processing setup and parameters can be viewed in [1].
Quasi-static tensile tests were carried out according to ISO 6892-1:2009. Continuous load increase tests were executed starting at low stress amplitude of 30 MPa. Stress amplitude was increased slowly at a rate of 10 MPa / 104 cycles. Load increase tests and constant amplitude tests were carried out at a frequency of 20 Hz. The results of process optimization, quasi-static properties, high cycle fatigue properties and the measurement methodology for characterization of process-induced defects are published in [2,6].
Two types of configurations are investigated in this study. For batch I, no pre-heating of the base plate was applied; whereas samples of batch II were manufactured with base plate heating (BPH) at 200 °C.
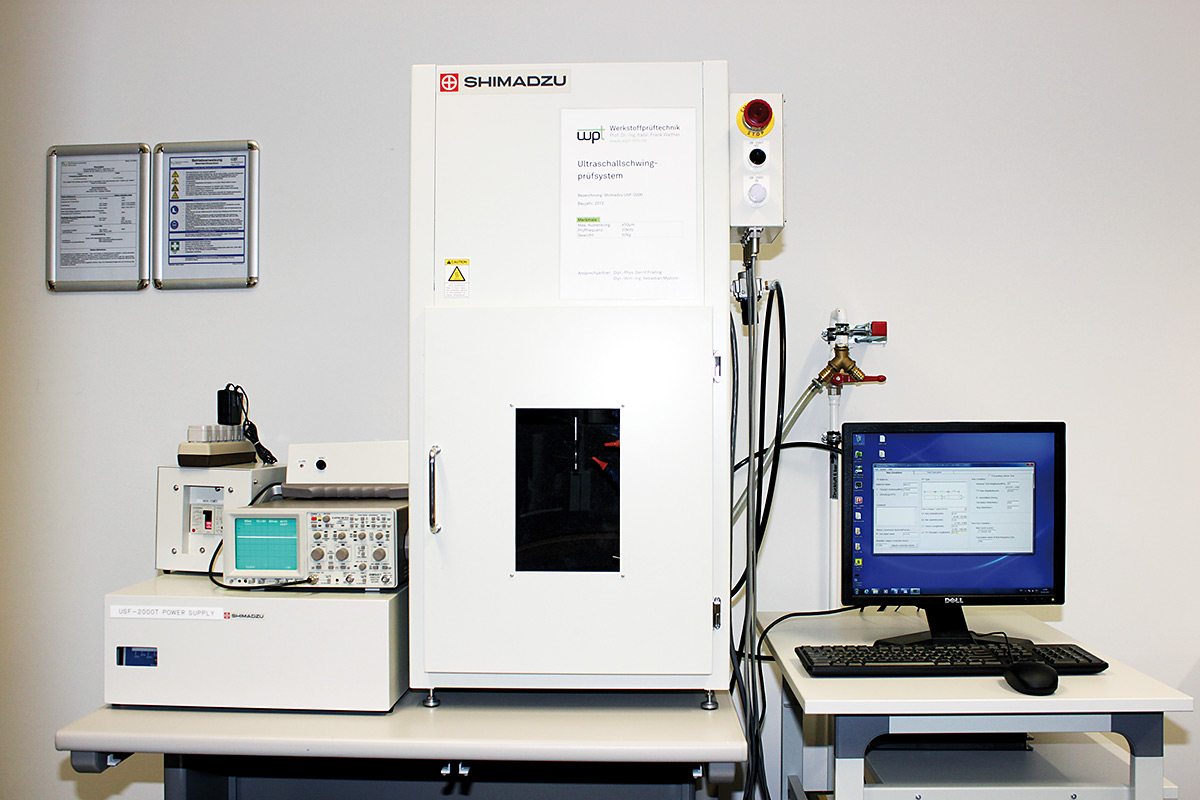 Figure 1: Overview of the Shimadzu ultrasonic fatigue testing system USF-2000
Very high cycle fatigue (VHCF) tests were carried out on an ultrasonic fatigue testing system at a frequency of 20 kHz. Figure 1 shows an overview of Shimadzu’s USF-2000 testing system while figure 2 explains the detailed principle of the test setup. A Piezoelectric crystal is used in the actuator which resonates at a fixed frequency of 20 kHz. In the ultrasonic fatigue testing system, vibrations are designed so that the longitudinal waves, transmitted through the solid body, resonate.
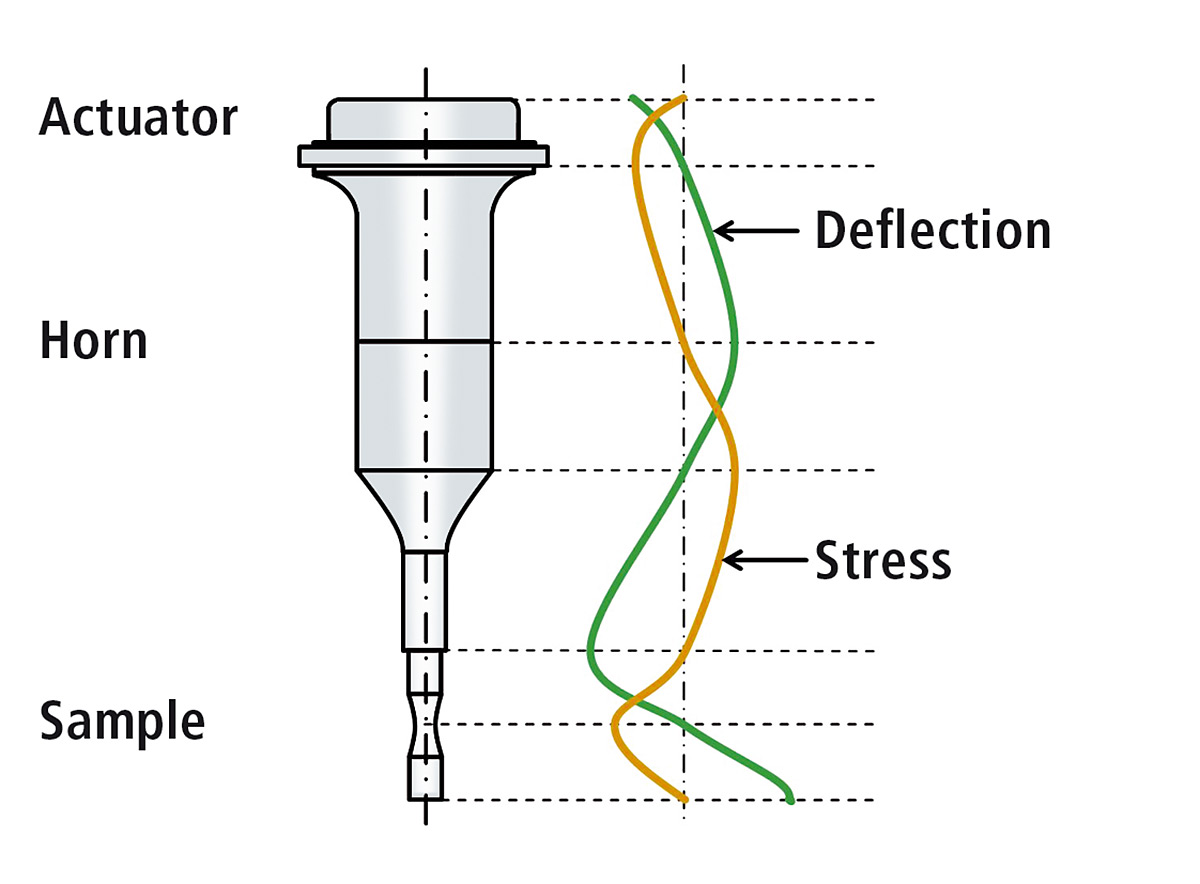 Figure 2: Functional principle of specimen loading at ultrasonic fatigue testing system USF-2000
The specimen with geometry shown in figure 3 is clamped only at one threaded end on USF and is free at the bottom end. The specimen is designed so that maximum stress is experienced at its middle and the maximum displacement occurs at its free end. To eliminate the temperature effect due to high test frequency, the specimens were cooled with compressed air during tests, and the tests were performed at a pulse-pause ratio of 50:50, i.e. the system was set to resonate for 200 ms and then stopped for the next 200 ms to cool down.
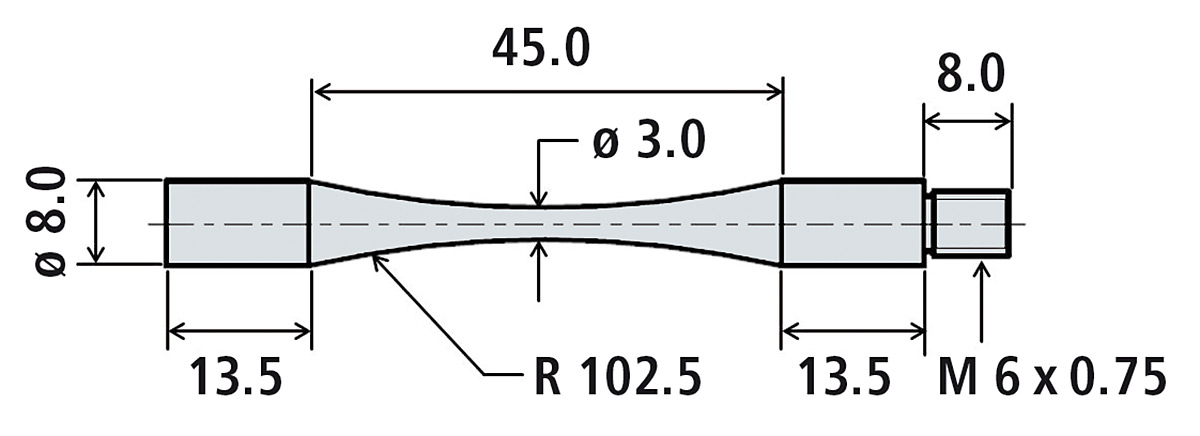 Figure 3: Specimen geometry for ultrasonic fatigue tests
Experiments for determination of the fatigue strength at 109 cycles were performed according to stair-case method. If a specimen at ultrasonic frequency failed at less than 109 cycles, the stress amplitude is decreased by 5 MPa for the next experiment. If the specimen did not fail at 109 cycles, the stress amplitude is increased by 5 MPa in the subsequent test. Failure of the specimen is based on the change in resonance frequency. When the micro-crack leads to final fracture, the natural frequency of the system reduces the operating frequency of the system and the test is terminated.
Results
Figure 4 shows exemplary surface micrographs for the two batches investigated. The remnant porosity is viewed only as the gas porosity. A difference in the pore fraction of the samples without and with base plate heating is observed. In the samples with base plate heating, large size gas pores are absent which are very critical in fatigue performance. The reduction of large pores is attributed to the de-gassing in the manufacturing chamber due to pre-heating.
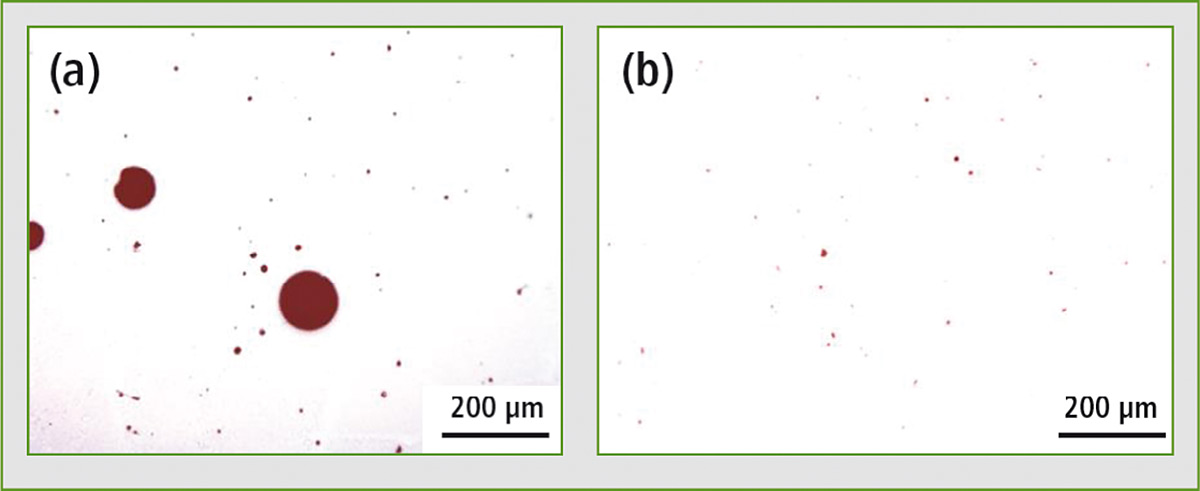 Figure 4: Exemplary surface micrograph for sample without base plate heating (a) and with base plate heating (b)
Figure 5 represents S-N curves for batches I and II in the region from high cycle fatigue to very high cycle fatigue. Experiments showed that fatigue fracture occurs beyond high cycle fatigue region in both the batches. The results of the experiments indicate that fatigue strength in very high cycle regime of samples manufactured with base plate heating is about 45 % higher than fatigue strength of sample without base plate heating. Fatigue strength at one giga cycle for batches I and II is 60.5 ± 4.7 MPa and 88.7 ± 3.3 MPa respectively. This increase in strength is attributed to elimination of the micro pores.
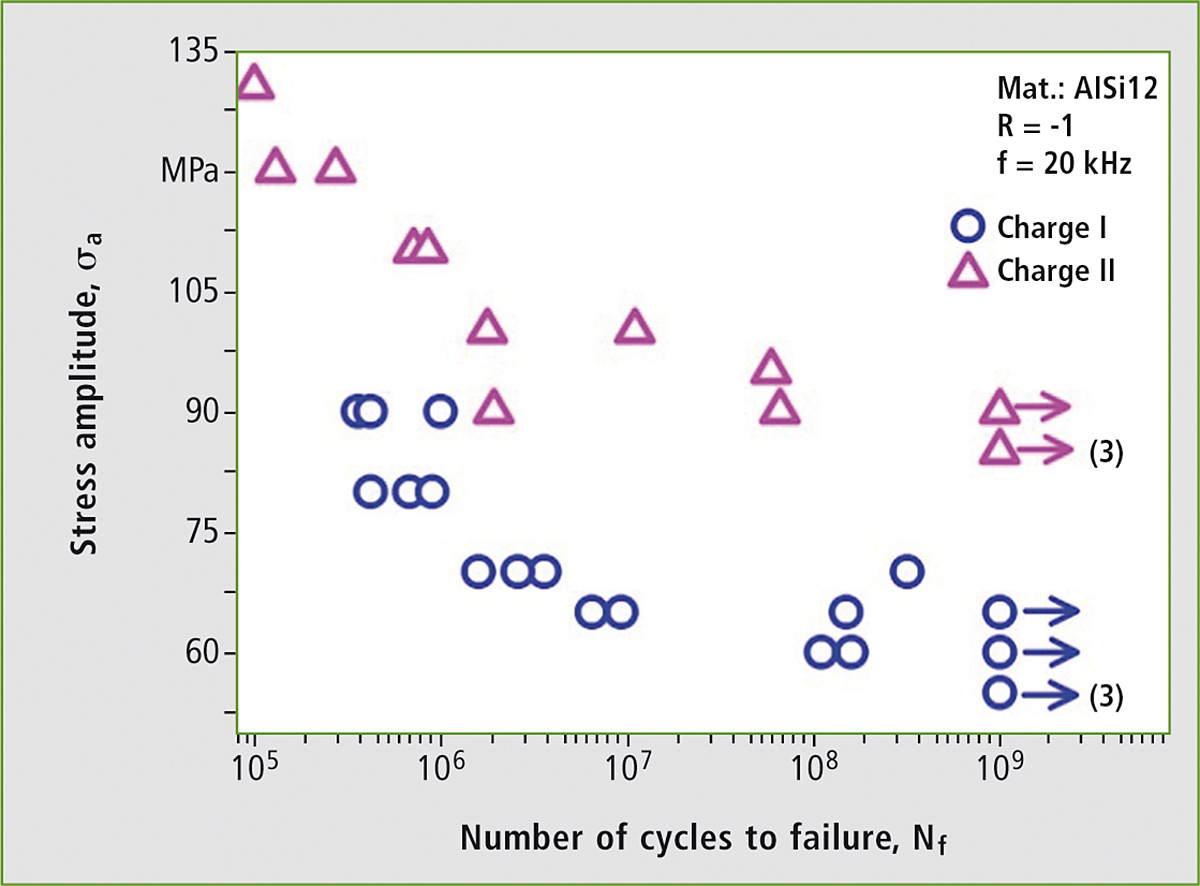 Figure 5: S-N characterization for ultrasonic fatigue testing results of samples of batch I (without BPH) and batch II (with BPH)
Outlook
New developments in testing machines enable going beyond previously known limits of knowledge. This opens the door to more intensive testing in most realistic conditions. The new capabilities in testing machines provide researchers with powerful tools to further investigate the effect of processing parameters on resulting functional performances in a wide range.
Authors
Prof. Dr.-Ing. Frank Walther, M.Sc. Shafaqat Siddique, Technische Universität Dortmund, Fachgebiet Werkstoffprüftechnik (WPT)
Baroper Str. 303, 44227 Dortmund, Germany
Tel.: +49 (0)231 755 8028
E-Mail: frank.walther@tu-dortmund.de
Web: www.wpt-info.de
Literature
[1] Siddique, S.; Wycisk, E.; Frieling, G.; Emmelmann, C.; Walther, F.: Microstructural and mechanical properties of selective laser melted Al 4047. Applied Mechanics and Materials 752-753 (2015) 485-490.
[2] Siddique, S.; Imran, M.; Wycisk, E.; Emmelmann, C.; Walther, F.: Influence of process-induced microstructure and imperfections on mechanical properties of AlSi12 processed by selective laser melting. Journal of Materials Processing Technology 221 (2015) 205-213.
[3] Pyttel, B.; Schwerdt, D.; Berger, C.: Very high cycle fatigue – Is there a fatigue limit? International Journal of Fatigue 33 (2011) 49-58.
[4] Benedetti, M.; Fontanari, V., Bandini, M.: Very high cycle fatigue resistance of shot-peened high strength aluminium alloys. Experimental and Applied Mechanics 4 (2013) 203-211.
[5] Morrissey, R.J.; Nicholas, T.: Fatigue strength of Ti-6Al-4V at very long lives. International Journal of Fatigue 27 (2005) 1608-1612.
[6] Siddique, S.; Imran, M.; Rauer, M.; Kaloudis, M.; Wycisk, E.; Emmelmann, C.; Walther, F.: Computed tomography for characterization of fatigue performance of selective laser melted parts. Materials & Design 83 (2015) 661-669.